How To Treat Mold On Seedlings: Get Rid Of Fungus Mold On Seedling

How To Treat Mold On Seedlings: Get Rid Of Fungus Mold On Seedling

How To Treat Mold On Seedlings

If you enjoy gardening, it’s likely that you’re aware of the potential damage that mold may cause to young plants. Mold has the potential to kill or seriously harm seedlings.

Untreated mold on seedlings may be treatable, so don’t worry. In this blog post, I’ll offer you some tips for preventing mold on seedlings.

Use the tips in this blog post with caution if your seedling has mold damage. With careful loving care, you can get rid of the mold and keep your seedling healthy!

What is mold?

What is mold

Among the fungi, mold is one type that develops on seedlings. Despite the fact that there are many different types of molds, they all prefer warm, humid surroundings. If you keep your seedlings in a place that is overly damp or moist, mold growth could occur.

  • The first step in preventing mold on seedlings is making sure that the environment is not excessively moist or humid. The use of dehumidifiers can assist maintain dry air. Make sure the seedlings have enough airflow if a dehumidifier is not an option.
  • If your seedling begins to sprout mold, remove them from the growing place as soon as you can. Examine each plant thoroughly after removing it from the grow chamber.
  • Throw away any plants that have an excessive amount of mold growth.
  • You can attempt to salvage a seedling if it only has a few areas of mold by carefully removing the impacted leaves. Make sure to fully wash your hands after handling the leaves with mold.
  • Apply a fungicide to the remaining leaves after removing the damaged ones. Make sure you adhere to the label’s instructions to the letter.

Mold can be a difficult problem to manage, but it can also be avoided and cured. By taking a few simple steps, you can keep your seedlings healthy and growing without mold.

What causes mold on seeds?

What causes mold on seeds?

Mold on seedlings is a frequent issue that can be brought on by a number of things. One of the most frequent causes is overwatering since mold prefers damp environments. Mold development can also be caused by poor drainage and stagnant air. Seedlings exposed to excessive light or those that are close together are both more prone to mold growth.

The first thing to do if you find mold on your seedlings is to look for the source. Adjust your watering schedule and make sure the seedlings have sufficient drainage because overwatering is to blame. Thin out the seedlings if overcrowding is the cause of the issue. Move the seedlings to a shady area if too much light is the cause of the issue.

You can attempt to remove the mold itself when you’ve determined its cause and fixed it. It is frequently sufficient to use a stiff brush to scrub the troubled areas or to mist them with diluted bleach solution. You might have to throw away the afflicted seedlings and start again if the mold doesn’t go away.

Although mold on seedlings is a prevalent issue, it may be avoided and treated. One of the most frequent causes of mold is overwatering, so be sure to water your seedlings sparingly. If mold does appear, make an effort to determine its root cause and take appropriate measures. Mold may frequently be removed by using a stiff brush to scrub the infected areas or by misting them with a weak bleach solution.

Harms caused by Mold on seedlings.

Harms caused by Mold on seedlings.

To stop additional harm, action must be taken as soon as mold is discovered on seedlings. Numerous factors, such as disturbing the roots, obstructing the light, and creating toxins that might kill the plant, can hurt the plant. There are certain methods you may take to avoid mold if you notice it on your seedlings.

  • The contaminated soil must first be removed, and fresh dirt added. Before adding additional soil, make sure the container or tray is thoroughly cleaned. You might also wish to give the plants a good water rinse to remove mold spores.
  • You can try to relocate your seedlings if you are growing them in a garden. The sunlight and air movement will aid in drying out the mold and eradicating any spores that might still be present.
  • The plants might need to be thrown out if the mold is bad or if any evidence of fungal development is present. It is crucial to treat as soon as possible since fungal growth can swiftly infect other plants.
  • It’s also crucial to watch out for future mold symptoms in your seedlings. The best course of action is always prevention, so make sure your plants are in a healthy environment.

How to treat and prevent mold from growing?

How to treat and prevent mold from growing

Don’t freak out if you notice mold on your seedlings! Even though it’s not perfect, it can be fixed. Determine the mold’s kind first. White mold can be eliminated by delicately removing it with a cotton swab dipped in rubbing alcohol. However, you’ll need to take more extreme measures if it’s black mold.

Since black mold is actually a fungus that is feeding on the plant, it is more challenging to eradicate. Spraying the plant with a diluted bleach and water solution works best for treating black mold. Replant the plant in new potting soil after allowing it to dry in the sun for a few hours.

How to get rid of mold on seedlings?

How to get rid of mold on seedlings

It’s crucial to take precautions to avoid mold on your seedlings as they grow indoors. Seedlings that have been exposed to mold may become more vulnerable to illness.

You may take a few quick steps to prevent mold on your seedlings:

  1. Maintain a clutter-free and tidy growing area.
  2. Use a drip irrigation system or a watering can with a long nozzle to water your seeds from below.
  3. Steer clear of overhead watering, which can promote the spread of mold.
  4. Use a fan or open a window to create adequate ventilation for your plants.
  5. Regularly check your seeds, and discard any seedlings that exhibit mold symptoms.
  6. You can help maintain your seedlings healthy and mold-free by paying attention to these suggestions.

Conclusion

Seeds can suffer from mold, but it is curable. The best approach to prevent mold is to take precautions, such as maintaining a clean and clutter-free growth space, watering from below, and offering adequate ventilation. If you do discover mold on your seedlings, you may remove it by either spraying the plant with a diluted bleach and water solution or gently cleaning it away with a cotton swab dipped in rubbing alcohol.

Watering Succulents: A Guide On How To Water Succulents

Watering Succulents: A Guide on How to Water Succulents

Succulents are beautiful, low-maintenance plants that are perfect for indoor and outdoor gardens. But one thing they require is regular and proper watering. In this blog post, we’ll give you a simple guide to watering your succulents so you can keep them healthy and thriving for years to come.

Watering Succulents

Understanding Succulents and Succulent Watering Requirements

Succulents require less water than other house plants, due to their ability to store water in their leaves and stems. In order to keep your succulents healthy, it is important to give succulents enough water. The best way to water succulents is to use a small container with a spout or spray nozzle. It’s important not to overwater, as this can lead to root rot. Watering is done when the top inch of soil is dry. 

If you notice any signs of wilting or yellowing, it’s likely that the succulents need water. However, make sure not to give more water to succulents than necessary. By following these steps, you can ensure that your succulents remain healthy and beautiful

Understanding Succulents and Succulent Watering Requirements

It is important to be aware of the type of succulent you have. Each variety of succulents has different requirements for watering, light, and temperature. Also, it is essential to know how often to water succulents and their individual needs. As succulents have unique watering requirements the frequency of watering is based on the type of succulent you have. Taking into consideration the light and temperature, a unique schedule is established.  Understanding the correct way to water your succulent is important for keeping it healthy and beautiful.

Preparing to Water Succulents

To prepare for watering succulents, the first step is to determine how often succulents need watering; this will depend on the type of succulents you have. Generally, succulents need watering once every two to three weeks; however, they may need watering more often in hot and dry climates. In cooler and humid climates with direct sunlight, succulents may need it less frequently. To ensure your succulents get the perfect amount of water, use well-draining soil and water the soil until the water runs out of the bottom of the pot. Then wait for the soil to dry before watering again. If you notice any signs of overwatering such as wilting leaves, reduce the watering frequency until the plant recovers.

Preparing to Water Succulents

For example, cacti typically need more frequent watering during the summer and less watering in winter. The amount of water you need to provide your succulent depends upon the type of succulent and the environment it is kept in. The two most popular ways to water succulents are either from the top by pouring water from above or from the bottom. The top-down method is to simply fill a bowl or container with water and place the pot containing the succulent in it. The bottom-up method is to fill a bowl or container with water and leave the pot in it for 15 minutes, allowing the roots of succulents to absorb moisture from the bottom. Both methods will keep your succulents properly hydrated without over-saturating them, ensuring they stay healthy and live longer.

Succulents Watering Techniques for Success

When it comes to techniques for successful succulent growth, consistency is key. Water succulents when the soil is dry and monitor how much water your plants need as every succulent, soil, pot size, and environment will all affect water needs. Depending on the type of succulent, you may need to water succulents once a week or even every other month.

Be mindful of the type of succulents you purchase and how much sun it requires. When watering succulents, always use clean water and water the soil directly, avoiding wetting the leaves as this can lead to rot or pest infestations. Also, be sure to use containers with drainage holes so that your succulents don’t become over-saturated with water. If you can maintain a consistent watering schedule, your succulents will thrive and reward you with their unique beauty!

This can be achieved by setting up a regular watering schedule that works for your plants. Additionally, considering the time of year and the environment the plant is in can help you adjust your watering schedule accordingly. However, when it comes to caring for succulents, there are different ways to keep them healthy and hydrated. The most important thing is to practice regular watering and adjust the schedule according to the needs of succulents. The time of year and environment is also important when implementing a watering schedule for your succulent plants.

4 Elements that Influence How Frequently You Should Water Succulents

Watering Succulents

Season

During the spring and summer, when succulents are actively growing, you’ll need to water them much more frequently. They rapidly extract water from the earth as they grow new stems, leaves, roots, and blossoms. Depending on the weather, such as the light and temperature, you might hydrate them three times every week. Succulent plants go dormant in the winter. You won’t need to water them very much throughout the season because their growth has stopped. Giving succulents too much water in the winter is one of the simplest ways to destroy succulents, so avoid using your watering can from November to March.

Size of the Container

Because succulents contain more soil that retains moisture longer, larger containers require less frequent watering. Small, shallow containers require more frequent watering since the soil dries out more quickly.

Light Level

Light Level

More water is required by succulents that receive 10 or more hours of direct sunlight than by those that receive fewer hours. Because they receive more sunlight and are exposed to harsher environments, outdoor plants typically require more water than interior ones.

Humidity

Humidity

Plants in high-humidity and cooler regions will require less regular watering since they can retain moisture for a longer amount of time than plants in hot, dry conditions.

How Much Sunlight do Succulents Require Each Day?

Succulents generally require at least 4-6 hours of sunshine each day to thrive. They enjoy being in places that are sunny and bright. Lack of sunshine will cause difficulties in succulents such as elongation or etiolation when the plants extend for more light. Weak stems and low growth are the results of this procedure. Lack of light causes succulents to lose their bright coloring and turn pale or back to a drab green tone. Plants that receive enough sunshine will display their whole spectrum of brilliant hues, showing their genuine beauty.

Ice Cubes for Watering Succulent

Does that explain how to water succulents? Without a doubt, no. The worst piece of internet advice is to water your succulents with ice cubes.

The fact that you can water your succulents gently and regulate the amount of water you give to your plants makes this idea appealing to certain people.

By now, you should be aware that we support comprehensive watering if you take our advice and apply it to this blog article. Be careful when you water.

Determining How Often to Water Succulents

To determine how often you need to water your succulents, consider the environment that they live in. For example, if the succulents are exposed to more direct sunlight, they will likely need more frequent watering than succulents in a cooler, shadier environment. How often you water your succulents will also depend on how big their pots are; if their pots are bigger. They can hold more water which means you don’t need to water them as often.

Determining How Often to Water Succulents

Generally, succulents should be watered every 7-10 days, but if the soil is dry earlier than that, then it’s time for a drink. Make sure to avoid overwatering as this can cause root rot and kill your plants. With the proper amount of care and attention, your succulents should stay healthy and happy for a long time.

Additionally, the time of year can also have an effect on how often you should water your succulent plants. During the warmer months, succulents may need watering more frequently due to increased evaporation and heat, which can reduce the soil’s moisture.

Similarly, during the winter months when temperatures are cooler and there is less sunlight, succulent plants will need watering less often. This also means that you’ll need to keep a closer eye on your watering schedule and adjust as necessary. To ensure the healthy growth of your succulents, be sure to properly assess the needs of your plants to determine the most appropriate watering schedule for them.

Final Say on Succulent Plants Watering

In conclusion, watering your succulents is an important part of their care. With the right amount of sunlight, water, and soil, you can ensure that your succulents stay happy and healthy for years to come. By following the simple guidelines provided in this blog post, you’ll be well on your way to becoming a succulent expert.

Succulent Care 101: A Succulents Grow and Succulents Care Guide

Succulent Care 101: A Succulents Grow and Succulents Care Guide

The popularity of indoor plants is rising, and succulents are a common selection. They are easy to keep, don’t require much effort, and have lovely appearances. This succulent care guide will help you with everything from choosing the right kind of succulents for your garden to fertilization and fighting aphids or other pests.

The health and happiness of your succulents still depend on you being aware of a few things, though. In this blog post, we’re going to share our best succulent care advice. If you’re thinking about acquiring a succulent or you already have one, make sure to keep reading for some helpful suggestions!

Choosing the Right Succulents

Choosing the Right Succulents

Succulents are an excellent choice if you’re searching for a low-maintenance plant to add to your house. These plants may grow in a range of environments and are simple to maintain.

It’s crucial to pick a succulent that is suitable for your individual needs while choosing one. Consider the following points:

  • Bright, direct sunlight is essential for the growth of succulents. Succulents can be grown indoors under artificial lighting if your home lacks a sunny area.
  • Succulents don’t require a lot of water because they can withstand droughts. Actually, one of the leading causes of plant death in this genus is overwatering.
  • Warm temperatures between 70 and 85 degrees Fahrenheit are preferred by the majority of succulents. You must pick plants that can withstand colder temperatures if you reside in a colder climate.
  • To prevent root rot, succulents need soil that drains properly. You can buy specialized succulent potting soil or make your own by combining sand and perlite in equal amounts.
  • During the growing season, fertilize your succulents once a month (spring and summer). Use a balanced fertilizer made for succulents and cacti.

You’re ready to pick the ideal succulent for your home now that you know what to look for!

Creating an Ideal Growing Environment For Succulent Plants

Creating an Ideal Growing Environment For Succulent Plants

There are a few things to think about if you want to provide your succulents with the best possible growing conditions.

  • First, for succulents to thrive, there must be lots of sunlight. You might need to use artificial lighting as a supplement if your area receives little natural sunlight.
  • Second, in order to avoid root rot, succulents require well-drained soil. Use potting soil that has perlite or pebbles in it to encourage drainage.
  • Third, because succulents are prone to dehydration, it’s crucial to water them frequently. Between waterings, let the soil entirely dry out, and watch out for overwatering.

You may cultivate a perfect growing environment for your succulents and promote their growth by adhering to these straightforward suggestions.

To properly care for your succulents, pick a plant that fits your requirements, provide a perfect growing environment, and water it frequently.

Fertilize and Water Succulents

Fertilize and Water Succulents

Because they require little care and can withstand drought, succulents have recently become one of the most popular plants to own. Even the most resilient succulents, meanwhile, cannot live without adequate care. This entails giving them regular irrigation and fertilization.

  • The climate, the kind of succulent, and the season all affect how frequently you should water your succulents. Succulents generally need watering when the soil feels dry to the touch.
  • You might need to water them as frequently as once every day in the heat. You can water them once every two to three weeks in the winter.
  • When it comes to fertilization, it is preferable to hold off until your succulents have started to develop vigorously. When applying, a balanced liquid fertilizer like 10-10-10 should be diluted to half strength.

Follow the instructions on the fertilizer bottle carefully, and avoid getting fertilizer on your succulents’ foliage.

Spotting Pests and Diseases For Succulent Care

Spotting Pests and Diseases For Succulent Care

As succulent owners, we should be aware of the pests and diseases that can affect our plants. Pests can be anything from insects to mites, while diseases can be caused by bacteria, viruses, or fungi.

Many pests and diseases are easy to spot if you know what to look for. For example, aphids are small, sap-sucking insects that can be identified by their small, pear-shaped body and two long antennae. They often congregate in large numbers on the underside of leaves, where they feed on plant sap.

If you do spot aphids on your succulents, don’t worry – they can be easily treated with a strong stream of water or insecticidal soap. Bacterial diseases can be treated with antibiotics, while fungal diseases can be treated with a fungicide.

Always remember that prevention is always preferable to treatment, so keep your succulents clean when caring for them. Don’t overwater plants, and always wash your hands and tools. This will lessen the possibility of pests and illnesses spreading, keeping your succulents healthy and lovely.

Tips for Healthy Succulents

Tips for Healthy Succulents

Plants known as succulents have large, fleshy leaves that can hold water. They can be found in Madagascar, America, and Africa; they are native to hot, arid conditions. These plants are low maintenance and a wonderful addition to any house. To maintain the health of your succulents, follow these suggestions:

  • Ascertain that they are in a well-lit area. Make sure they are next to a window if you are keeping succulents indoors because they require bright light to thrive.
  • They need regular watering. Approximately once every week, succulents need to be watered. You don’t need to water them as frequently as you would other plants since they store water in their leaves.
  • Every couple of months, fertilize them. The nutrients they require to thrive will be given by a suitable fertilizer for succulents.
  • Give them some room to breathe. Make sure there is enough room for your succulents to spread out because they don’t like to be crowded.
  • Keep the frost off of them. Bring your succulents inside or store them in a protected area if you live in a region where the winters are chilly.

By following these simple tips, you can keep your succulents healthy and looking great.

Bonus Care Tips To Grow Succulents

Succulents are one of the most popular plants to grow indoors. They are hardy, easy to care for and come in a wide variety of shapes and colors.

If you are new to growing succulents, here are a few tips to help you get started.

  1. Choose the right pot for your plant. Succulents need well-draining soil, so make sure your pot has drainage holes. You can also add gravel or sand to the bottom of the pot to help with drainage.
  2. Water your succulent sparingly. Allow the soil to dry out completely between watering. Over-watering is one of the most common mistakes made when caring for succulents.
  3. Provide bright, indirect light for your plant. too much direct sunlight can scorch the leaves. If you live in a particularly sunny climate, you may need to place your plant in a spot that gets morning sun and afternoon shade.
  4. Fertilize your succulent once a month during the growing season. Use a fertilizer designed for cacti and succulents. Be sure to follow the directions on the package, as too much fertilizer can damage the plant.
  5. Don’t be afraid to experiment. Succulents are very forgiving, and even if you make a few mistakes, your plant will likely still thrive. So have fun and enjoy your new plants!

From the article, we can learn that succulents are relatively easy to care for. They need well-lit, spacious conditions with well-drained soil. Watering and fertilizing should be done sparingly.

Weed Identification 101 — How to Spot the Top 7 Grassy Weeds

Weed Identification 101 — How to Spot the Top 7 Grassy Weeds

Weeds can be tricky to deal with – especially when they look like they could be grass. You don’t want to pull out the wrong plants, so how can you tell the difference between weeds and grass?

In this blog, we’ll be outlining the best ways to spot and get rid of weeds that look like grass. Read on to learn more!

Identifying Weeds That Look Like Grass

Identifying grass-like weeds can be tricky, as they often share physical attributes such as having upright leaves and similar coloration to grass.

However, there are some tell-tale signs you can look for when discerning grass from grass-like weeds. Firstly, grass grow horizontally from a stem, rather than being self-supporting like grass-like weeds.

Secondly, grass typically has a vibrant green hue compared to weeds such as johnsongrass sedge and crabgrass, which often have a yellowish tinge. Lastly, grass has flattened stems while grass-like weeds typically have triangular stems.

All this considered, it’s important to take the time to properly evaluate grass-like weeds before attempting to eradicate them as they may actually be beneficial grasses!

This is why it’s important to look for key differences in the leaves of grass-like weeds and grass, such as the texture of the leaf blade, the shape of the leaf blade base, and whether or not there are any hair or bristles on the weed’s stem.

Finally, it is important to take note of the key differences between weeds that look like grass and actual grass. Looking out for these differences can ensure that you have a lush, healthy lawn without pesky weeds ruining your hard work!

Eliminating Weeds That Look Like Grass

Identifying and eliminating weeds that look similar to grass is necessary in order to maintain the health and beauty of your lawn. Thankfully, there are several common “imposters” that you should be aware of.

Crabgrass, dallis grass, rat tail fescue, rescue grass, Nutsedge and Wild Onion, creeping bentgrass, quackgrass, and bentgrass are just a few of the weeds that look like grass.

The real key to success in your gardening journey is to be vigilant and act swiftly when you spot these weeds that look like grass in your lawn. With a little bit of know-how and a lot of hard work, you can remove them and soon say goodbye to unwanted weeds!

There are 7 common weeds that appear to be grass but are actually not – dandelion, chickweed, yellow nutsedge, annual bluegrass, red sorrel, broadleaf plantain, and wild garlic.

If you’ve ever looked out onto your garden and thought “wait, is that grass or weeds?” – then you are not alone.

It can be tricky to tell the difference between the grass and these pesky weeds. So if you find yourself asking “What are these pesky weeds that look like grass?” then look no further! Here’s a quick breakdown of the 7 most common ‘imposters’.

Reading further:

Understanding the differences between grasses and these weeds is key to successfully managing them in your lawn. While this may seem like a daunting task, there are some common weeds that are like grass, including quackgrass, goosefoot, knotweed, and crabapple.

These weeds tend to grow faster than grasses and are often distinguishable by their leaf shapes which tend to be wider and more rounded.

Besides this common group of weeds that are like grass, other varieties such as dandelion, wild garlic, and velvetleaf can also be found in lawns.

Thankfully, with a little knowledge and ongoing attention to your lawn, you can successfully manage these weeds that look like grass.

Dandelion

dandelion

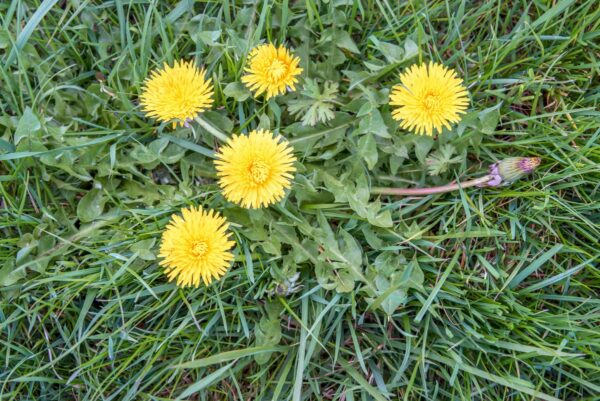
Dandelion can be identified by its yellow color flowers with long stems and jagged leaves, so it’s not hard to understand why it can be mistaken for grass by the untrained eye. But, as it turns out, there are several types of weeds out there that look a lot like grass!

These seven types include crabgrass, wild onion, wild garlic, purslane, foxtail, quackgrass, and nut sedge. All of these succulent weeds have the potential to creep up on unsuspecting lawn owners!

Why Should We Remove Dandelion as Weed?

Many people view dandelions as weeds because they are aggressive colonizers that spread quickly in lawns and gardens, displacing desirable plants and native vegetation. Furthermore, after being pulled up, they can come back due to their extensive taproots.

However, dandelion plants also offer several advantages, such as early-season nectar for pollinators and food for animals like goldfinches and rabbits. They can be used in several recipes, including salads and drinks, and are also edible to humans.

In general, personal tastes and the particulars of the area in issue should be taken into consideration while deciding whether to remove dandelions or let them grow.

For instance, if a lawn or garden is maintained for aesthetic purposes, getting rid of dandelions could be useful.

On the other hand, if the goal is to provide a habitat for wildlife, letting dandelions grow might be the greatest choice.

Chickweed

"<yoastmark

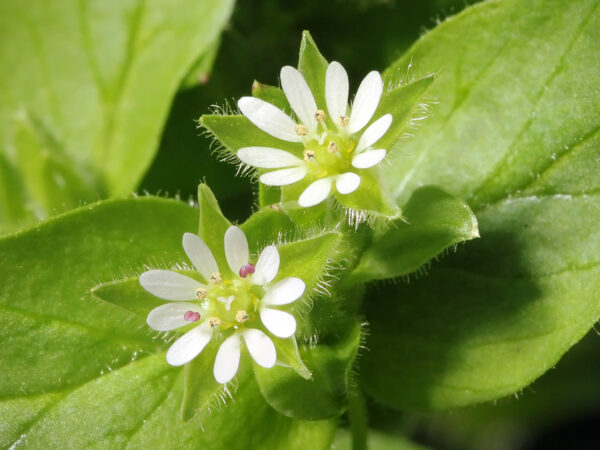
Chickweed has small white flowers, oval leaves and a mat-like growth habit, making it one of the most common types of weeds that are like grass. It’s a fast-growing plant and spreads quickly, so take extra care to remove it from your lawn.

Luckily, it’s not the only weed that are like grass – dandelion, plantain, white clover, and oxalis all have similar growth patterns and coloration.

Thankfully, all of these weeds can be eliminated in the same way, by digging out the root or applying a herbicide. Take heart; with a bit of effort, you can turn your lawn into a weed-free paradise again!

Why Should We Remove Chickweed as Weed?

Weeds, such as chickweed, are undesirable in certain situations due to their ability to spread rapidly and compete with desired vegetation for resources such as light, water.

In garden beds and lawns, chickweed can quickly overtake other plants and make it difficult for them to grow. This can result in a less attractive appearance and reduced yields for fruits, vegetables, and flowers.

Yellow Nutsedge

Yellow Nutsedge

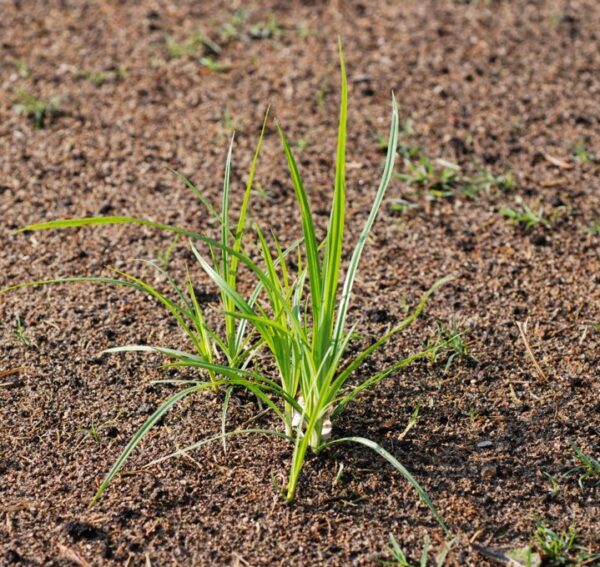
This Grassy Weed has thin triangular leaves which look like a V-shape notch at the tip, as well as small brown nutlike tubers growing below ground level on the rhizomes. Admittedly, it looks a lot like grass, but rest assured, these pesky lawn weeds play no part in your picturesque lawn.

In fact, it’s one of the seven weeds that can often be mistaken for grass! If you’ve ever seen Japanese stilt grass, you probably thought it was just a patch of frisky blades of grass.

But if you look closer, you’ll notice its small flowers and long seed heads that differentiate it from ordinary grass.

Why Remove Yellow Nutsedge from Lawn?

Removing yellow nutsedge from a lawn is often necessary to maintain the appearance and health of the grass, as well as to prevent the nutsedge from spreading further on the landscape.

There are several methods for removing nutsedge, including hand-pulling, using herbicides specifically formulated to control nutsedge, and preventing its growth by maintaining a healthy lawn and improving soil conditions.

It is important to follow the label instructions when using herbicides and to properly identify nutsedge to avoid accidentally killing desirable plants.

Green Foxtail

"<yoastmark

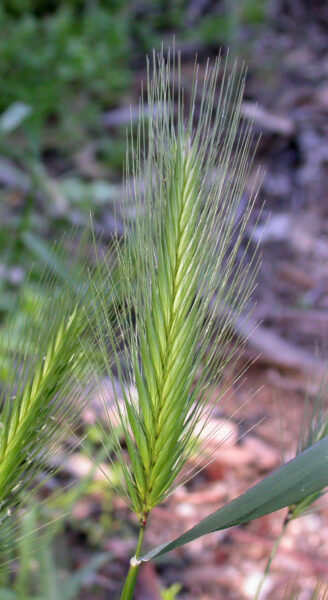
Foxtail is yet another lawn weed that’s frequently mistaken for grass due to its bushy shape and light green color.

And there are four more – bermudagrass being the most notorious of them all. So make sure to check these weeds out before blissfully mowing away!

Why Remove Green Foxtail from Garden?

Green foxtail also called (Setaria viridis) is a common weed in gardens and agricultural fields, and it is often considered undesirable because it can compete with desirable crops and plants for resources such as light, water, and nutrients.

Green foxtail is a fast-growing weed that can quickly colonize a garden or field, and its dense, bushy growth habit can make it difficult for other plants to establish and thrive.

Annual Bluegrass

Annual Bluegrass

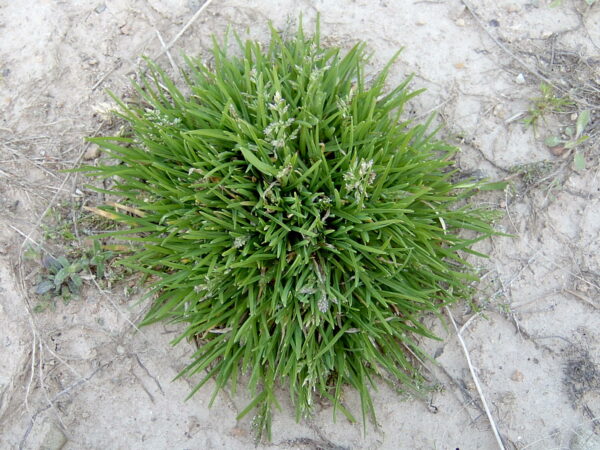
Annual bluegrass can be recognized by its dense habit and narrow blade shape while red sorrel has heart-shape leaves with reddish undersides and distinctive seed heads that resemble fox tails.

These weeds can be especially tricky to spot when they enter your lawn and attempt to masquerade as blades of grass!

Keeping an eye out for these seven common grass-lookalikes can help you keep your yard healthy and weed-free.

Why Remove Annual Bluegrass from Lawn?

Annual bluegrass also called (Poa annua) is a common weed in lawns that are often considered undesirable due to its ability to spread quickly and compete with desirable grasses for resources such as light, water, and nutrients.

Unlike most cool-season grasses, annual bluegrass is a winter annual that germinates in the fall and grows throughout the winter and spring.

This can result in a patchy appearance to lawns and can make it difficult for the desirable grass to establish and thrive.

Crabgrass

Crabgrass

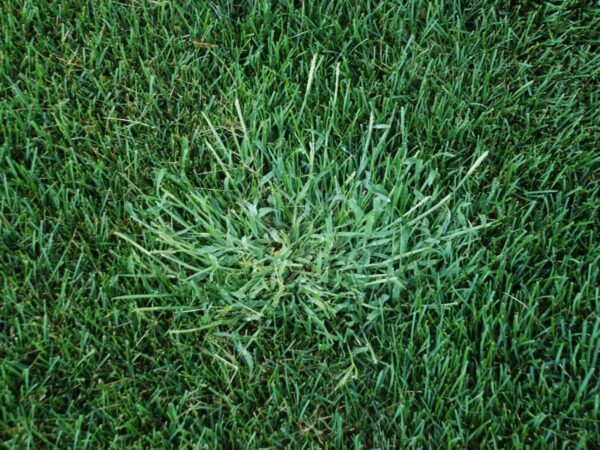
Crabgrass or hemlock grass is a low-growing weed with long, thin blades and a noticeable seed head, dandelions have broad leaves and daisy-like flowers that eventually become those telltale puffballs, while quackgrass has a coarse texture and spreads quickly through underground stems.

Foxtails are identifiable by their spiny awns (or “tails”) while two other weeds – spurge and plantain – have rounded leaves with prominent veining.

Finally, look out for clover, which has three rounded leaflets with white crescent markings. Detecting these crafty invaders early can help keep your lawn looking its best!

Why Remove Crabgrass from Lawn?

Because of its quick spread and aggressive growth pattern, crabgrass (Digitaria spp.) is a widespread weed in lawns that is sometimes regarded as unwanted. It does this by competing with desirable grasses for resources like light, water, and nutrients.

Warm-season annual weed crabgrass sprouts in the spring and spreads swiftly, frequently forming dense mats that can quickly engulf a lawn.

In addition to its unpleasant appearance, crabgrass is more vulnerable to heat, dryness, and disease than many cool-season grass varieties, which can further deteriorate the health and appearance of the lawn.

It’s crucial to maintain a strong, dense stand of attractive grass on a lawn in order to prevent or get rid of crabgrass. This can be done by giving the grass enough water, fertilizer, and mowing, as well as by using preemergent herbicides to stop the spring germination of crabgrass.

Post-emergent herbicides can be used to control crabgrass development in lawns where it has already been established, but they might not be as effective as preemergent alternatives.

To prevent mistakenly destroying attractive plants, it’s crucial to read the label carefully and correctly identify the weed before using any herbicide.

Broadleaf Plantain

Broadleaf Plantain

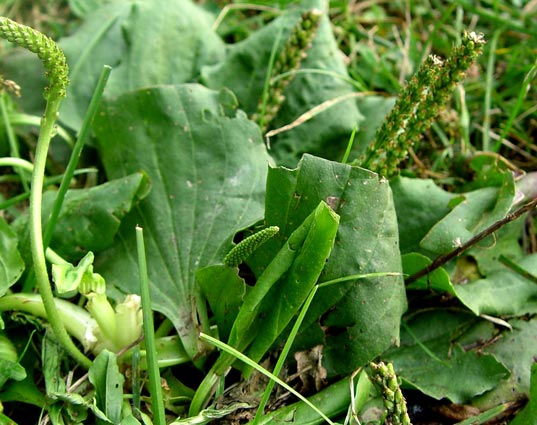
Plantain has broad oval-shaped leaves with prominent veins branching off from a central rib while wild garlic features light. Also, plantain has broad oval leaves with prominent veins branching off from a central rib while wild garlic features light colored Parallel veins running the length of its narrow leaves.

These two weeds seem to have more in common with each other than they do with regular grass. Identifying and distinguishing these two weeds from traditional grass may prove difficult, but it is an important step in keeping your lawn looking beautiful.

Why Remove Plaintain from Lawn?

Plantain (Plantago major), a common weed in lawns, is generally regarded as undesirable due to its stiff leaves, rapid spread, and propensity to compete with desirable grasses for resources like light, water, and nutrients.

The plantain has a dense rosette of leaves that can swiftly colonize a lawn and obstruct the establishment and growth of the best grass. It is difficult to mow because of its thick, leathery texture.

The ugly appearance of plantain is made worse by the fact that it is more susceptible to heat stress and drought than many cool-season grass kinds, which can further harm the lawn’s health and appearance.

Bentgrass

Bentgrass

There are several different species of it, including creeping bentgrass, colonial bentgrass, velvet bentgrass, and redtop bentgrass. Creeping bentgrass is the most commonly used species for golf courses and sports fields because of its ability to form a dense, uniform surface and tolerate low mowing heights.

Bentgrass is also popular for lawns in cooler regions, where it can provide a beautiful, finely textured lawn with proper care and maintenance.

How Herbicides Are Useful in Protecting Your Lawns from Common Weeds?

Herbicides are chemicals that are used to eradicate or kill undesirable plants, also known as weeds. They can be a useful tool for safeguarding lawns, gardens, and crops against the competition of weeds that can rob the targeted plants of essential nutrients, water, and light.

Herbicides can be used to assist preserve the health and aesthetics of your lawn, lessen the need for human weeding, and boost crop output.

It’s crucial to choose the appropriate herbicide for your unique needs while making your selection because various herbicides target various plant species and may operate in various ways.

Additionally, it’s crucial to carefully read the directions and use the product safely, keeping in mind any possible threats to people, animals, and the environment.

How to Identify Grass Weeds?

Grass weeds can be difficult to kill because they often look like grass species. However, there are several characteristics to look for that can help distinguish grass weeds from the desired grass:

  • Leaf Shape: Observe the shape and arrangement of the leaves on the plant. Weeds may have different shaped leaves compared to the desired grass, such as narrower or wider blades.
  • Height: Weeds may grow taller or shorter than the desired grass and may also have different growth patterns such as being spiky or bushy.
  • Flowers and Seeds: Some grass weeds produce flowers and seeds, which can be a distinguishing characteristic.
  • Root System: The root system of weeds may also differ from the desired grass, such as having a shallow or more aggressive root system.
  • Time of Germination: Observe the time of year when the weed begins to grow, as some weeds germinate at different times than the desired grass.
    If you are still unsure, you can bring a sample of the plant in question to a local nursery or cooperative extension office for identification.

How to Get Rid of Tall Grass Weeds?

Getting rid of weeds in tall grass can be done in several ways.

  1. Pulling: Manual pulling, particularly while the soil is moist, can be useful for small infestations. To avoid regrowth, make careful attempts to kill all the roots.
  2. Regularly mowing weeds can help to kill the reproduction of seeds and control how far these seeds spread in yard. To completely get rid of the weeds related to it, though, it can take a few mows over time.
  3. Herbicide: Herbicides are useful for weed control in tall grass in your yard. Make sure to select a product that particularly targets the kind of weed you have, and carefully follow the directions.
  4. Solarization: For bigger areas, solarization can be an efficient way to kill weeds that grow in tall grass. To destroy the weeds and any weed seeds in the soil, this includes enclosing the area with clear plastic for several months during the hottest time of the year.
  5. Cultural practices: By keeping a lush, healthy lawn or garden, you can lessen competition from tall grass weeds and make it more difficult for them to kill. Regular lawn or garden maintenance includes watering, fertilizing, and mowing.

How to Maintain Healthy Grass on Lawn?

Maintaining a healthy lawn calls for routine care and attention to ensure that the grass may flourish. Here are some recommendations for keeping a healthy lawn:

  • Watering: Either by irrigation or rainfall, grass requires a weekly watering of 1.1 to 1.5 inches. To promote the establishment of deep roots, it is best to water sparingly and deeply.
  • Follow the directions on the fertilizer bottle to apply regular fertilizer to your grass. The roots of the grass grow deeply with the aid of fertilizer.
  • Regularly cut your lawn but try not to do so all at once. You should remove only one-third of blade length every time you mow.
  • Aeration: Aerating your grass encourages improved water and nutrient uptake while also enhancing soil health.
  • Control of weeds: Keep an eye out for weed development on your lawn and treat it right away to stop it from spreading.
  • To prevent illness, regularly check your grass for symptoms like discolored patches or irregular growth. You should consult an expert in lawn care for the treatment after detection of such condition.
  • Controlling thatch: Thatch is a coating of decomposing grass and other organic matter that builds up on the soil’s surface. Too much thatch might suffocate your roots, therefore it’s crucial to clear it frequently.

You can make sure that your grass stays green and healthy for many years by following these instructions and routinely checking the condition of your lawn.

Proactive Measures for Avoiding Weed Grasses

Proactive steps for avoiding weed grasses include regularly inspecting your lawn for new weed growth and removing it before it takes over the area. To make the process less tedious, it helps to be able to recognize grass from weeds. Grass typically has a certain uprightness and uniformity that weeds lack.

Ultimately, the grass looks like grass, while weeds look like an uninvited guest on your lawn! Regardless of how big or small the weeds are, it’s important to get rid of them. Take control by regularly pulling them out or using an herbicide to stop them in their tracks.

Additionally, keeping your lawn well-watered and mowed at the appropriate height can help to prevent the growth of weed. Weeds that look like grass can be troublesome. But with the right maintenance and care, you can keep your grass looking pristine and weed-free year-round.

A lot of grass weeds thrive in dry conditions. So, it’s important to give your grass plenty of water and keep it mowed to a reasonable length.

That way, grass weeds will have a harder time competing with your grass for resources. So don’t forget to water and mow your grass if you want to stay on top of those pesky grass weeds!

Finally, using pre-emergent herbicides can be an effective way to keep weeds from taking over your lawn.

To get rid of it, it’s important to use pre-emergent herbicides. They can keep weeds from invading your lawn and outcompeting your regular turf.

By preventing their seeds from growing, you can ensure that your lawn remains weed-free and looks its best.

Final Say

In summary, weeds are known as unwanted grass and when they look like grass, they make your lawn look bad. However, if you pay special attention to your lawn, you can identify these weeds. Take the necessary measures to get rid of them quickly.

Removing weeds is important for maintaining the health and appearance of lawns and gardens. Weeds compete with the desired grass for resources and can spread disease, leading to reduced growth and vigor.

Additionally, some weed species can become invasive and difficult to control.

There are various methods for removing weeds, including manual removal, mulching and using herbicides. But it is important to choose the right method and follow safety and environmental guidelines when using chemicals.

By removing weeds, a lawn or garden can look attractive, healthy, and well-maintained, and the desired grass can thrive.

Remember this information, prevention is always better than cure. So, be sure to use good weed control methods and stay on top of weed maintenance all year.

With a little patience and care, you’ll be able to keep your lawn looking its best for many years!

Hardening off seedlings – Get your plants transplant-ready!

Hardening off seedlings – Get your plants transplant-ready!

If you are familiar with gardening, you might have heard that “Hardening off seedlings is essential for healthy growth of your seedlings into robust plants”. A good hardening procedure ensures the foundation for your transplant’s health. Here is the complete guide to starting off the hardening off plants.

Hardening off seedlings - Get your plants transplant-ready!

What is hardening?

Plants are very similar to human babies. Before we send our children to school, we will introduce little activities to them and take them outside for play dates, so that they could set up well in the school. The same applies to your plants as well.

Seeds establish into seedlings in a controlled environment in pro-trays with controlled light, nutrients, and water. The external or outdoor conditions are adverse or harsh when compared to the controlled environmental conditions, where seeds germinate and establish into seedlings.

Hardening off is the procedure where the seeds are slowly acclimated or prepared well before they are transplanted in the main field and hardening off also prevents transplantation shock.

Is it necessary to harden off seedlings before transplanting?

The answer is pretty much yes!!! If you transplant your seedlings without hardening, their leaves might scorch up, the plant might die due to transplantation shock (inability of young seedlings to hold direct sun, strong winds and excess or little soil moisture).

How to harden off your seedlings?

How to harden off your seedlings?

Hardening off is generally performed when the seedlings are 2 to 4 weeks age or when they developed at least one set of true leaves. The seed start hardening, and it may take seven to ten days. Here is the step-by-step guide to hardening off your seedlings.

Start hardening in dappled sunlight.

Start hardening in dappled sunlight

It is very important to remember not to be very harsh at the beginning with seeds. The first step of hardening is to bring your seedlings out of the controlled or indoor environment. Find a spot in your yard where it receives dappled or partial sunlight and keep your seedlings for 3 to 4 hours.

Make sure the seedlings are well moisturized before you set them up for hardening and there are more chances of wilt. After keeping them outdoors in a shady spot, place them back in their previous spot. You can repeat this procedure one more day based on your transplantation schedule.

Shift them to bright sunlight in garden.

Shift them to bright sunlight

It’s time for a little promotion for your plant. After exposure to dappled or partial sun, move them to a spot where bright sunlight is available. Expose your plants to the bright afternoon sun for 3 to 4 hours. Take them back indoors at night.

Repeat this process one more day and this time, reduce the amount of water for irrigation. This step prepares the plant for future drought conditions.

Expose your seedling to full light

Expose your seedling to full light

This is the crucial step in hardening off. Make sure you watered your seedlings well. Choose a spot that receives an ample amount of sunlight and place your plant there. Expose it to full sunlight for at least 4 hours and bring them indoors at night. Keep an eye on pests and diseases and you will find any go for neem oil spray. 

A little more sun than yesterday for better hardening

A little more sun than yesterday for better hardening

Your seedling had acclimated well to direct sun. All you need to do now is increase the duration of sunlight. Expose your seedlings to full sun for at least 6 hours and bring them indoors only at night. Repeat this process for one more day and reduce the amount of irrigated water this time.

Keep it outdoors at night to acclimatize for external weather

Keep it outdoors at night to acclimatize for external weather

Exposure your seedlings to direct sun for 6 hours like the former step. Do not bring them indoors at night and leave them throughout the night at the same spot. You can procrastinate this step, if the outdoor night temperatures are too low and the weather is too windy.

 Your seedling is all ready for transplantation in garden.

 Your seedling is all ready for transplantation

Now, it’s time for your little seedling for transplantation. Make sure you are transplanting your seedling at the right depth, and you are following the right spacing. Check them for pests and diseases regularly and support them with a stake if necessary. 

Hardening off plants

Hardening off plants

If you are growing your plants indoors or growing them in a greenhouse or net house, before transplanting your plants to the main field or shifting them outdoors, you need to harden off plants. You can follow the similar procedure discussed above to harden off your plants. In addition to the above steps, hold irrigation or reduce your irrigation frequency to prepare your plants to withstand droughts or periods of low water availability.

Pro-tips:

  • If you find any seedlings affected by the pest or diseases, it is always advised to isolate them from healthy seedlings and treat them with organic solutions separately for effective pest management.
  • weeds act as carriers for pests and diseases. make your transplantation field weed free by taking up weed management practices like hand weeding and herbicide application.
  • gently brush off your seedlings with your fingers to prepare them to withstand the winds.

Remember these points while hardening off your plants and seedlings.

  • Always use gentle motions for transferring your seedlings and plants from one place to another place.
  • Don’t be too harsh on your plant babies from day 1 of hardening off.
  • Do not go for hardening if the external climatic conditions are too harsh.
  • Do not disturb the root zone of your plant too much while transplanting.
  • Gently uproot your seedlings from pro-trays or grow bags while transplanting to the main field.

Planting succulents: How to plant succulents?

Succulents are an attractive and eye-catching way to add color and interest to your environment. Succulents are also resilient and long-lasting, preferring neglect to regular care.

Another advantage is that cultivating succulents does not require a green thumb. If you reproduce growing circumstances comparable to their native surroundings, your succulents will survive and even reproduce on their own.

Planting succulents

So how to repot and plant succulents?

When to repot succulents?

It is vital to repot your succulent container garden at various periods. The first is immediately after you purchase them. You are able to grow your succulents in organic soil that does not drain effectively in nurseries.

This works great in the nursery the environment is regulated, but it does not function well after you bring your succulents home. After purchasing succulents, it is essential to repot them in new soil.

When your succulents have filled up or outgrown their current pot, it’s time to repot them. They are frequently “root bound,” which means that the roots have filled up the container, and the plant has no room to produce additional roots.

It’s common for succulents from a nursery to be root bound since it lowers the rate at which succulents grow, allowing the nursery to repot their succulents less regularly.

As a general rule, leaving 1/2″ to 1″ (1-2.5cm) between the pot’s border and the succulent’s leaves is ideal. Choose a pot that is around 4″ inches in diameter if your succulent is about 3″ inches in diameter.

So how to plant and repot succulents?

Things to keep while growing plants in succulent container garden-

The size of the flowers and plant

You can use a single succulent plant or a mix of succulent plants. It all depends on your goals. The container’s size should be dictated by the plant or plant’s size, and vice versa.

The size of the flowers and plant

The dimensions of the pot

The container or pot size is way too crucial. Succulents have shallow roots and do not thrive in deep pots filled with soil. Succulents, on the other hand, demand a shallow container with just enough earth to allow the roots and plant to spread out.

The dimensions of the pot

The type of succulent to plant

The plants you use, including color schemes, color combinations, shapes, and sizes, are influenced mainly be your own tastes. There is no correct or incorrect method to mix succulent plants. Combining succulent plants with regular potting soil will also work.

Plants with similar development requirements can be in the same container, if possible, with suitable potting mix as they have mostly same needs.

Remove your pot and soil.

Remove the nursery container and as much dirt as possible as the first stage in effective succulent planting. In nurseries, succulents are generally typically planted in soil that is considerably too thick and holds far too much water. The more nursery soil you can get rid of, the healthier your succulent roots will be.

You may not be able to remove all of the dirt without injuring the roots, which is just fine. Simply remove as much as you can while being careful with your succulent.

Remove your pot and soil

Placing the mesh

Although a drainage hole is necessary for your succulent’s health, you don’t want your soil to tumble out of it. Use mesh tape to keep the more significant bits of soil from dropping out.

Mesh tape works effectively because it allows water to drain quickly while still holding most of the soil in place. You should expect some “dust” to fall out, which is typical.

Fill your pot almost to the top with water.

Fill the container almost but not quite to the top with succulent soil before placing your succulent in it. Leave some space at the top for the roots to fit comfortably, and you’ll be able to add extra dirt later.

Fill your pot almost to the top with water

Placing your succulent

It’s finally time to put your succulent in the planter! You have the option of planting it centered or off-center.

Fill the pot all the way to the top with water.

It’s time to refill the pot. You only need a small amount of space between the top of the soil and the top of the container. To prevent rotting, keep the succulent leaves entirely above the soil.

This will keep your soil from sinking after a few waterings.

Add a top dressing to the pot.

Finish with a top treatment for your succulent in the pot. That’s why you left some room at the top of your pot.

As you add your top dressing, press down on the mud to help the succulent remain in place.

Allow one to two days after your succulent is planted and the top dressing is applied before watering it. This rest period allows the roots to recover before they begin to absorb water, which aids in the prevention of root rot. Drainage holes are necessary to make to plant succulents ideally.

Add a top dressing to the pot

Tips after repotting

Keep succulents away from extreme heat.

If you plan to plant succulents outside, bear in mind that just a few varieties can withstand temperatures below freezing. Although most succulents survive in the sun and heat, for some desert environments may be too severe.

Avoid exposing them to direct sunlight.

Not all succulents love to spend their entire day in the sun, despite the belief of many novice succulent growers that the sunniest spot in the garden is best for their plants.

Succulents should be grown close to a window or in a greenhouse where they will get at least two or three hours of direct sunlight each day. If you don’t have an open window, you can overwinter your succulents under grow lights.

Avoid exposing them to direct sunlight

Succulents do like watering.

Contrary to common belief, watering your succulents often, particularly during the active growing season, will not kill them. Allowing the soil to dry between waterings as it allows the roots to breathe. During cold or low-light seasons, this may vary from every few days to every two to three weeks, depending on the weather, time of year, container size, and soil requirements with conditions in the garden.

Please provide them with a suitable soil and potting mix

Succulent roots detest sitting in wet soil, so add sand or similar hardy mix to your soil mix to improve drainage. Nonorganic minerals such as perlite, small gravel, crushed granite, and clay can help in this part.

Please provide them with a suitable soil and potting mix

Do not backfill after planting.

Dig a hole the size of the root ball and place the succulent in it while planting succulents in your garden.

The earth may progressively reenter around the roots at the same rate as the plant if this air space is removed. This encourages the development of new roots near the soil’s surface so that they may breathe.

What is the best soil to use for succulents?

Succulents detest remaining in soggy soil for long periods of time; therefore, they require soil that drains properly. The best succulent soil encourages quick air and water exchange in the root system of the plant. It is best to use a combination of cactus potting mix and perlite.

Use perlite to aid in drainage and aeration.

The typical potting mix to perlite ratio is 1:1 or 2:1.

Conclusion

When raising succulents, several effects need to be taken into consideration. Overwatering plants, skipping the top dressing, and failing to remove dirt from the roots are the most frequent crimes. By putting the forenamed ways into practice, you may steer clear of these frequent outcomes and get a head start on creating a productive succulent garden.

Repotting succulents- Steps to repot succulents

Repotting – Steps to repot succulent correctly in soil.

Knowing how to handle succulents is one thing; knowing how to repot succulents is another. If you’re a fan of these charming miniature houseplants, you’re well aware that, while they’re resilient, they do need some attention. This is especially true if the plant has outgrown its container or if they have not replenished the soil in a few years.

It may appear to be a difficult task, but it is vital that you devote the time necessary to keep your succulents healthy and thriving. It doesn’t take long, and the end product is definitely worth the time. Don’t worry if this is your first time.

Repotting succulents- Steps to repot succulents correctly

How to repot succulents’ plant in pot?

It’s vital to remember that your succulent should be semi-hydrated before you begin repotting it, so water it a few days ahead of time. Before repotting, you should also remove any dead leaves.

First and foremost, information, you must prepare a new environment for your succulent. Find a slightly larger pot than the one it is now in. You’ll need something that’s 20% wider and 20% higher. In general, terra-cotta pots with drainage holes are a fantastic choice.

To improve drainage, place a small stone over the hole at the base of the new pot. You may even cover it with a smashed pot clay fragment.

Fill the new pot to about a third of the way with succulent soil. It is crucial not to use regular compost since it is too dense and will not drain soon enough. There is also specialist cactus soil, so choose the soil that is best for your succulent.

The next step is to take your succulent out of its current container. Because this might become nasty, you should definitely set down some newspaper or do it outside.

First, look for any roots that have grown through the underside of the pot. If they have, you must carefully peel them out from their clutches. Turn the planter on its side and wiggle the succulent at its base to see if it comes loose.

The succulent may have some dirt mixed in with the roots now that you remove it from the pot. Brush as much of this as you can.

Set the succulent gently on top of the earth in the new container. Depending on its height, you may want to dig a small hole for it.

Fill the succulents air plants with more soil mix until the roots are entirely covered, holding it upright with one hand.

However, make sure the soil does not come into touch with the leaves since this might cause them to deteriorate. When you try to water your succulent, you will make a mess if you fill the container to the brim with soil mix!

To compress the earth, gently push down on it.

You now have a new home for your succulent to develop into. Wait a week before watering it again, as a general rule.

How to repot succulents plant


When to repot while gardening and why?

It would help if you repot succulent plants for a variety of reasons. Whatever the reason, it’s always ideal to do it right before their growing season, which is usually in early spring or early fall for most succulents. The succulents will have adequate time to recover from this method of repotting.

Look for the following indicators to help you determine whether to repot your succulents:

Succulents are generally present in small plastic containers, which might inhibit their growth. So, once you bring your new plant home, it is very advisable that you relocate them to a different plant within two weeks. When this happens, the roots usually start to emerge out of the potholes because the space is getting too limited for them to grow to their total capacity.

The soil dries out suddenly after watering, forcing more frequent watering, or if you observe that the water does not settle through the pot’s drainage hole, risking root rot in your succulent.

The plant starts to seem sickly or infected. Despite enough sun exposure and irrigation, once lush and luxuriant, succulents’ leaves may unexpectedly turn limp, shriveling, or yellowing. When this happens, inspect your succulents right once for possible insect infestation, root rot, and other ailments. If there is no indication of illness on the plant’s leaves, remove it from the pot and check the roots.

Remove any that are dead or do not appear to be healthy, and then plant them in a clean pot with fresh soil.

The repotted succulent begins to sway or tumble. When you see this signal on one of your succulents, it doesn’t always mean that you have to relocate to a larger container. While the roots are still happy in their current container, the top of your succulent has become heavy, prompting a repot to a larger pot to protect it from tipping over.

When to repot and why?

Should you repot your succulent during dormancy?

No, you should not. Dormancy is the state in which a plant is alive but not actively developing. Repotting them may disturb their growth cycle and cause damage to your succulents. Because most succulents are dormant in the summer or winter, spring and autumn are ideal times for repotting. Repot your succulents every two years on average to ensure the soil is fresh and rich and there is enough space for the plant to flourish. Timing is another crucial element to consider.

Should I repot succulents like cacti after buying?

Repotting succulent as soon as possible is a good idea.

Here are some reasons why repotting succulent’s is a good idea:

The succulent soil mix in which the plant is placed frequently holds too much water and is, therefore, inappropriate for succulents and cacti.

Moving the plants from the nursery soil to more suitable soil will ensure their long-term health.

Should I repot succulents after buying?

Can repotting succulents kill them?

Can re-potting succulents kill them? While it is rare, repotting succulents can be fatal if done wrong. Simply transplant healthy succulents and make sure they are adequately watered before starting.

Repotting succulents in the winter?

One should be repotting succulents in the spring or early summer, right before their active growing season. Avoid applying it in the fall and winter since it promotes new growth, which may lead plants to become weak and slim in the winter.


Repotting succulents in the winter?

Conclusion

Repotting succulents is simple, but you must know how to do it correctly to guarantee that your plant’s health and stability are not jeopardized. All succulents are unique and require somewhat different care, so before repotting, consider the delicacy of your plant and any possible hazards to you, such as cactus needles.

How do you keep the string of pearls happy? When should you repot your string of pearls?

How do you keep the string of pearls happy?

How do you keep the string of pearls happy?

You’ll get a healthy, attractive string of pearls plants if you know how to take care of them, the plant care tips. The leaves are small and spherical and look just like pearl beads. The tendrils can reach up to one meter in length if they are well cared for. This plant is also known by its Latin name Senecio Rowleyanus.

As you will see, this plant can shine indoors in bright spots if it is placed on one of our shelves or in a hanging plant holder.

It is a versatile and adaptable plant. You can grow it in your garden by carefully tending a string-of-pearls plant. It is actually one of the best hanging basket plants because it has a vivid green color that makes a great contrast to other colorful flowering plants.

What temp is too cold for string of pearls?

  • String of pearls plants can thrive if they get at least 6-8 hours of direct and bright sunlight per day. They thrive in temperatures of 72oF and can be grown indoors or outside.
  • The string is made from succulents and requires very little water. It thrives on neglect, in fact. They make pots look great with designs that have ‘faces.’

What does an overwatered string of pearls look like?

It is very easy to care for a string pearls plant. They will thrive as houseplants as long as they have enough light and are not overwatered.

Surprisingly, overwatering can cause leaves to shrivel in string of pearls. If you give your plants more water than they can handle, their leaves will burst and become mushy.

Favorable conditions for string of pearls

Understanding the origins of the plant and its growth habits in the wild will help you care for it. They naturally spread across the desert floors in Southern Africa where water is scarce and light and heat levels extremely high. They have developed thick, fleshy, pearl-like leaves to keep water from escaping their leaves.

The best conditions for a string pearls plant to flourish are:

  • The perfect cactus- and succulent compost is Spring and summer: Use a succulent to nourish your plants; They can tolerate temperatures as low as 50oF (10oC) but they need plenty of light and warmth.
  • Keep a string pearls plant out of a conservatory if you intend to grow them as a houseplant. The string of pearls is not a fan of low temperatures. They should be kept away from areas that might experience humidity, even for a short time, such as the bathroom or kitchen. A room with south-facing windows is ideal.
  • If conditions are favorable and temperatures stay above 55-61oF (13-16oC), then a string or pearls plant can produce small white flowers that have a unique cinnamon scent. Although the flowers are visible in spring, growers value the delicate tendrils of the leaves more than their small, insignificant blooms.

Does string of pearls need direct sun?

  • String of pearls plants requires regular sunlight every day. If they are placed in a dark corner, they will not thrive. 8 hours of indirect sun will give a better environment than full-on direct sunshine.
  • It’s difficult to find the right balance for this delicate plant. Photosynthesis is more difficult because of the string pearls’ thick and round leaves. It can only be done by a thin, pale window (also known as an epidermal window) on the beads.
  • The string of pearls must be exposed to direct sunlight for at least two hours (hitting the top and sides of both plant) when they are in their home. Hanging in a south-facing window would be ideal.

Are these plants able to withstand too much sun? If the string of pearls plants in your home starts to turn yellow it might be an indication that they are getting too much sunlight. Move your potted plant to a spot with less intense sunlight.

Does string of pearls need direct sun?

How often should I water string of pearls?

The string of pearls plants grows best in dry conditions. They don’t require watering more than once per fortnight. Also, be careful not over-water them. Pot-grown string pearls plants should be watered from below. This will allow them to absorb water from the bottom of the pot so that the delicate pearl leaves aren’t on wet compost.

  • If you have indoor plants that are house-grown, it is important to be sparing with watering. A string of pearls doesn’t need much water. Water them only once they’re completely dry. You can test it by putting your finger in the soil.
  • They’re used during long periods of drought so water only after the soil has dried all the way to the bottom of the pot or when the leaves are just beginning to shrivel.
  • Avoid getting your plant’s leaves wet while watering. This can lead to leaf spot disease. To keep your plant looking its best, remove any dead or wilted stems.

Growing string of pearls plant

String of pearls plants can be grown outdoors in bright, sunny areas with lots of light. They are a great choice for hanging baskets because of their textural leaves and unique spreading, trailing habits.

They will thrive outside if they are able to mimic the conditions in their natural Southern African desert habitat. Water your plants more frequently if it is really hot or dry outside.

Repotting string of pearls plant – When should you repot your string of pearls?

Repotting string of pearls plant - When should you repot your string of pearls?

Do string of pearls like shallow or deep pots? Because they have a shallow root base, string of pearls plants do not need to be repotted as often.

There are two signs that your string of pearls may be ready to upgrade. If the root-bound plant develops a circular growth pattern, and can even grow out of its pot. The plant may also lose its leaves and slow down in growth.

  • Use succulent and cactus compost that is free-draining to repot your plants.
  • Also, be sure to choose a ceramic or terracotta pot for drainage. Ceramic pots are more prone to becoming waterlogged.
  • It is important to place them in a low, wide pot to allow them to grow as they would in their natural environment.

A spring-of-pearls plant is repotted in spring but only if necessary. They thrive in small pots so they should be repotted only if the roots can be seen through drainage holes at the bottom. A pot should not be more than 2 inches in size from the current one and must have good drainage. After repotting, water thoroughly.

How to prune string of pearls plant – How do I make my string of pearls thicker?

A string of pearl plants requires very little pruning. However, it is important to monitor their condition and only prune when necessary. Remove any dead or wilted stem leaves as necessary to keep your plant looking its best.

To make your plants more vigorous, you should consider propagation. Place a 4-inch-long cut in water. Within 3-4 weeks, roots will develop and you’ll be able to either add another plant to your pot or start a new one.

Note:

String of pearls plants should be handled with care. The delicate bead stems are mildly toxic. They can easily fall off if moved, so it is best to keep these plants away from pets and children.

Introduction to butchering animals – Day-To-Day Care Schedule for Each Season

Introduction to butchering animals

It is very crucial to do intense research on how to butcher animals. If you don’t know what you are doing you are risking contaminating the meat and it being harmful to your family and anyone else or animal that eats the meat. Then all the money, time, and effort put into raising the animal go to waste.

There is so much to butchering animals than what I can put in this book. So please do your research. If you can’t find someone to teach you hands-on. Then don’t invest too much into your chickens at first and know that you just may lose some towards the beginning and get better as you go.

  • Slice the chicken open through the breastbone to reveal its internal organs. Remove the guts, lungs and windpipe, liver, and so forth. This is when you can contaminate your meat! Then bag the chicken for freezing!
  • A simple way of bagging is with shrink wrap bags. This ensures the chicken stays safe and no freezer burn while storing. (Like what you would buy at the store if you were to get a whole uncooked chicken).
  • For this, you need the shrink wrap bags, zip ties, scissors, and another tub of hot water at 180°F. You take the chicken out of the ice water bath and put it upside down in the bag. Then twist the bag as tight as you can and zip tie it as close to the chicken as possible.
  • The bag will be filled with air, so you want to take a knife and poke a tiny hole in the bag. Preferably where the breast area is and about the same area for each chicken.
  • After you have poked the hole, you want to dip the bag into the 180 degrees water for about 3 secs, then take it out.
  • Immediately you want to put a label over the hole (make sure you dry off the area so it will stick).
  • You can have simple ones with it handwritten “chicken” with the date or have them professionally printed.
  • However, you want to do it, does not matter as long as the hole is covered, and you have labeled it, so you know what it is and when it was processed.
  • Therefore it’s important to poke the hole in the same area for every chicken and in the breast area so that you can cover it easily with the label.
  • After you have labeled it, you want to cut off the excess plastic. Then store in the freezer.

The overall butchering process for beef is a bit more complex:

  1. The slaughtering process requires a gun, bullet, and knife.
  2. The skinning process consists of a sharp knife, sharpening stone, gambrel, hydraulic tractor with a bucket, chain hoist, and hose.
  3. The evisceration process demands a reciprocating saw, meat tote, and an area where you can discard the guts (ideally a hole in the ground or a place deep within the woods).
  4. The butchering process requires more meat totes, sharp knives, a bone saw, waste buckets, a bone dust scraper, and a meat grinder.
  5. Packaging consists of butcher wraps, plastic wraps, freezer tapes, and other bags.

STOP!! Again, please do not do this unless you have done your research and can have someone help you that knows what they are doing. That way you don’t risk contaminating your meat. Beef cattle are way more expensive than chickens.

  • Take the cattle to an area where you can cut when it collapses, and make a cut near the esophagus to make it bleed out as much as possible.
  • Next, remove the animal’s head with a reciprocating saw and hang the body from the gambrel with the skid steer.
  • You can also use a tractor or a chain hoist. The skinning process is done by creating a circle around the hooves into the midline area through the inside of the leg. This is when the genitals are also removed if they haven’t been already.
  • Next, bring the cow down to the plastic to reduce the possibility of gravitational swelling of the internal organs.
  • This is a great time to cut the stomach open and remove the contents within the cow’s belly for the compost pile.
  • This is when the removal of the internal organs occurs. Finally, you have the option of either wet or dry aging the meat.
  • The wet method is done in a vacuum-sealed bag and is kept at temperatures in the mid- 30°F for up to a month. This is the method that commercial producers tend to favor.
  • The dry method is more traditional and is done by placing the meat to hang in an area with airflow and controlled humidity and temperature for up to three weeks. This is generally done when the meat is butchered during the colder seasons.

Day-To-Day Care Schedule for Each Season

Just like your plants, your animals require schedules to keep them fed, taken care of, and thriving. The most important one is to give your animals water and food daily. This is what will determine their health status and ability to reproduce.

  • Make sure that you have systems set up for your animals to feed and drink, such as a built-in chicken feeder.
  • Next, you must check up on your animals and ensure that they are feeding properly. This goes hand in hand with another daily task, which is to check your animals’ health status. You don’t necessarily have to walk around with health checking equipment, but you need to keep an eye on them and be more intentional about ensuring that they are functioning normally.
  • Cleaning out the fecal matter in your animals’ shelters is another task that needs to be done regularly.
    • This will ideally be done daily; however, the frequency is largely contingent on the number of animals you have housed in a particular structure.
    • Clearing the feces more often will prevent your animals from spreading bacteria that could be consumed from droppings being present in their food and water.
  • If you have chickens, you should check your henhouse for eggs as often as possible since you want to find the eggs while they are still fresh.
    • This task goes along with taking care of the nesting boxes where the eggs will be located.
    • Although the hens don’t defecate near the eggs, it is common to find some residual feces in these areas, so replacing the pine shavings with fresh ones will allow the nest to remain clean, consequentially keeping your eggs clean.
  • For those who have animals for milk, you may wonder how often you should milk your goats or cows.
    • The answer is every day, up to twice a day. Not milking your animal can harm them and lead to sickness or injury.
    • If you don’t have the time to dedicate to milking your livestock often, you should rethink having milking animals.

The best way to ensure that the above-mentioned tasks are being handled as often as possible is to create a routine for them.

  • The morning routine of someone who has a backyard homestead like family A could have no animals and would consist mainly of chores that need to be undertaken for the garden, as they would not be preoccupied with feeding any chickens or rabbits because there could be none.
    • They would wake up, walk around the garden, and check their plants. This would be the perfect time to water the plants as well.
    • They could harvest some produce and prune some plants.
    • Their evening routine could consist of another walk, where they check to see if their plants are safely protected against predators.
    • If they do have some animals, then they would add in the care needed for them during the daily walks along with caring for the garden.

A homestead that is larger than a few acres like family B and C that could contain a few chickens and goats would have a typical morning routine like an early rise followed by a walk in the garden.

The family would likely feed their pets and then proceed to feed the chickens and the goats. They might release the animals from their shelters so that they can take the time to clean up. Their evening routine would likely involve putting their animals safely back into their shelters.

A family on a larger homestead with animals will have a more extensive morning routine compared to an urban homesteader who only does gardening. Aside from the daily schedules required to keep your animal’s taken care of, a monthly schedule can also help as it will be founded on a seasonal premise.

Again, this will vary for everyone depending on their animals and the land plot size. Let us observe three potential seasonal schedules.

January

During one of the winter months or the start of the year. Homesteaders can find themselves drafting up their goals for the new year. In the case of Family A, they could begin to organize seeds and test them for viability. They could review their garden journal and facilitate certain aspects of it.

All three families will benefit from editing their budgets and reviewing their overall financial plans. Family B and C would benefit from being particularly diligent about ensuring that their animals are healthy. Plans for new animal purchases, breeding, and culling are also practical during this time. Overall, it is a self-reflective time, and all families should prioritize addressing their current homesteading skill sets and planning to facilitate them wherever possible.

April

Is the month that begins to invite the spring and is usually when the spring cleaning is done. All families would benefit from going into their basements, gardens, barns, storage sheds, and main house areas for deeper cleaning.

  • Family B and C should seek to get their chicken coops fresh bedding before the weather gets warmer.
  • Family A should continue to sow its seeds. It needs to be done under a row cover if they decide to plant outdoors. The family should prioritize sowing carrots, lettuce, arugula, radishes, and Swiss chard (while taking their specific hardiness zone into account).
  • This is the time when dairy livestock increases their production. Family B and C can benefit from this dairy-abundant season by making goat cheese.

October

Ushers in the season of the last harvest. This is when family A will collect their annual crops and ensure that their extenders are working adequately. The garden is now exposed to the harsh conditions of the elements, so it is a perfect time to begin covering it up.

Any mulching, weeding, and general tidying will make for a much smoother spring planting season. The family’s perennial plants will also benefit from added protection during this time. Family B and C can begin looking into winter-proof outdoor systems for their barns, animals, and water. It is also ideal to give the chicken coop a last deep clean before the winter arrives.

Plants that have invasive tendencies

Plants that have invasive tendencies

Avoid plants that have invasive tendencies

With a climate that allows many garden plants to thrive. Home landscapes can be beautified with both native and non-native species. Some plants can become invasive and take over the landscape and natural areas. They can also cause economic loss and pose a threat to the biodiversity of the local environment.

Why are these plants so invading? Native plants from different parts of the globe have evolved in specific locations where they have formed strong interactions with wildlife and the land. They have been managed by natural predators and climatic factors. These plants can spread quickly and overwhelm local communities if they are moved from their natural environments to areas with similar climates and geography.

Some invasive plants, like Japanese honeysuckle, privet and kudzu are well-known. Many ornamental plants are also susceptible to invasive traits.

English ivy can be planted both as a vine or as a groundcover. It is an attractive plant with beautiful foliage and is always green. It can crowd out other plants and become too large if it is not kept under control. English ivy can overtake trees and choke them. They can also be more susceptible to being blown over by windstorms.

Bradford pears are known for their poor growth habits. Storms can break limbs or sections of trees. They can produce viable seeds, which are easy to disperse. They proliferate rapidly and sprout root sprouts to form dense stands. They are more resilient to adverse growth conditions and have a greater ability to infiltrate ecosystems.

Thorny Elaeagnus, a dense evergreen shrub, produces long shoots that can be grown into nearby trees. The leaves are copper-colored and sometimes variegated. It can thrive in extreme environments and has a fast growth rate. The shrub also produces fragrant, red fruits in the autumn. These small, olive-shaped fruits are eaten by birds and animals and spread the seeds to nearby areas. They can often be found along roadsides.

Vincas are often used as groundcovers. They produce violet-colored flowers, and they have woody vines. The adventitious roots that develop at the nodes can cause dense mats and large infestations. They thrive in shaded areas and under trees.

  • Many other ornamental plants can also be invasive.
    • Although the southern magnolia (Magnolia Grandiflora) is a native of South Georgia, it can be escaped cultivation and has invasive tendencies to North Georgia.
    • In natural areas, leatherleaf mahonia tends to grow out of control more often than other species.
    • Invasive characteristics include the growth of ornamental grasses Miscanthus, nandinas, and burning bushes.

Avoiding these plants with invasive traits is the best way to go.